Insulating hot water pipes is a simple, effective way to save energy and money. Hot Water Pipe Insulation involves covering pipes with materials that reduce heat loss as water travels through them. Insulated pipes also deliver hot water faster, reducing the wait time and water waste at taps. It’s a practical solution for both homeowners and the environment.
Studies highlight the significant benefits of pipe insulation. Experts report that it can increase water temperature by 2°F to 4°F. This allows households to lower heater settings without losing comfort. Insulation also reduces energy use by minimizing heat escape from pipes. Additionally, it prevents freezing during winter, lowering the risk of costly damage. Researchers agree that this small improvement creates noticeable savings.
Imagine a home where hot water arrives instantly, energy bills shrink, and frozen pipe worries disappear. That’s the power of insulation. This upgrade offers more than just convenience—it’s a step toward smarter, greener living. With affordable materials and easy installation, it’s a win for your budget and the planet. Start insulating today and feel the immediate benefits! This blog explains key benefits, materials, and step-by-step instructions for achieving proper pipe insulation.
Why Insulating Hot Water Pipes Matters
Hot water naturally loses heat while traveling through pipes. Uninsulated pipes increase energy consumption because water cools before it reaches faucets. Insulation prevents this heat loss, maintaining hotter water temperatures.
This increase allows users to lower the water heater setting, saving energy without sacrificing comfort. Insulation also helps reduce standby heat loss from pipes, conserving even more energy.
Key benefits of insulating pipes include the following:
- Lower energy bills: Reduce heat loss and water heater energy use.
- Conservation of water: Hot water arrives faster, lowering water waste while waiting.
- Protection against freezing: Prevents pipes from freezing during extreme cold weather.
- Enhanced water temperature control: Allows for better heat retention in water systems.
Key Benefits of Insulating Hot Water Pipes
When it comes to home improvement projects, few are as cost-effective and rewarding as pipe insulation. Here are some of the standout benefits it offers:
Lower Energy Bills
Uninsulated pipes allow heat to escape as hot water travels through them. This means your water heater must work harder and longer to maintain desired temperatures. Insulating your pipes significantly reduces this heat loss, lowering energy use and decreasing monthly bills.
Faster Access to Hot Water
Do you wait for what feels like forever for hot water to flow through your taps? Insulated pipes retain heat better, so less water is wasted while waiting for it to heat up. This saves water, a precious resource, while reducing frustration in daily routines.
Protection Against Freezing
During winter’s peak cold, uninsulated pipes run the risk of freezing. Frozen pipes aren’t just inconvenient—they can cause costly damage. Insulation provides a buffer, preventing freezing and safeguarding your plumbing system in low temperatures.
Improved Temperature Control
Insulated pipes maintain consistent water temperatures. This means fewer temperature fluctuations in showers or faucets and greater efficiency if your water heater is set at a lower temperature, reducing energy use.
Types of Pipe Insulation Materials
Not all insulation is created equal. Different materials serve various needs based on your budget, location, and exposure levels. Below are some of the most popular options:
Foam Tubing
- Best For: DIY installations and easily accessible hot water pipes.
- Advantages: Lightweight, affordable, and simple to install. Foam tubing is often pre-slit, making it ideal for quick projects.
- Application: Slide the pre-cut tubing over the pipe and secure its seams with tape.
Fiberglass Insulation
- Best For: Cold climates and high-temperature water systems.
- Advantages: Provides the most durability and excellent insulation for freezing conditions.
- Application: Wrap fiberglass insulation around the pipe and secure it using foil-backed tape or wire. Be sure to wear gloves while handling it to avoid irritation.
Rubber Insulation
- Best For: High-moisture areas or spaces needing flexible material.
- Advantages: Resistant to both moisture and heat, with excellent flexibility for tight spots or angled pipes.
- Application: Slide the rubber sleeves over the pipes, ensuring they fit snugly.
Foil-Faced Wraps
- Best For: Homes prioritizing large-scale energy savings.
- Advantages: Combines flexible insulation with reflective foil for maximum efficiency.
- Application: Wrap tightly around pipes and secure with clips or adhesive. This material also works around irregularly-shaped pipes.
Choosing Materials for Insulating Pipes
Several options exist for insulating hot water pipes. Each material has specific advantages based on budget, location, and installation ease.
Foam Tubing
Foam tubing is one of the most commonly used pipe insulation methods. It is easy to install and cost-effective. Foam tubing wraps snugly around pipes and is available in pre-slit designs.
- Best for: Homes with exposed pipes or DIY-friendly installations.
- Thickness: 3/8-inch or 5/8-inch, depending on insulation needs.
- Installation steps: Measure, cut to length, place the sleeve over pipes, and secure with adhesive tape.
Fiberglass Wrap
Fiberglass is durable and provides excellent insulation for areas with freezing temperatures. Gloves and protective clothing are necessary when handling fiberglass.
- Best for: Areas near heat sources like water heaters or in very cold climates.
- Thickness: At least 1-inch thick for sufficient protection.
- Installation steps: Wrap the fiberglass around the pipes and secure it using wire or foil tape.
Foil-Faced Wraps
Foil-faced wraps combine insulation with an outer reflective surface to maximize heat retention.
- Best for: High-efficiency insulation objectives in more customized setups.
- Installation steps: Measure and cut wrap to size, then secure tightly using adhesive or clips.
Rubber Insulation
Pre-slit rubber sleeves provide durability and flexibility. Most types are resistant to heat and condensation, making them ideal for various environments.
- Best for: High-moisture areas or tight spaces requiring flexible materials.
- Seal edges with tape or clamps.
Step-by-Step Guide to Insulating Hot Water Pipes
Proper installation maximizes the effectiveness of pipe insulation. Follow this straightforward approach for a successful project.
Step 1. Gather Tools and Materials
Before beginning, collect all the necessary supplies. This includes:
- Measuring tape
- Adhesive or aluminum foil tape
- Scissors or utility knife
- Safety gloves (for fiberglass installations)
Step 2. Measure Pipes
Start at the water heater. Measure all accessible hot water pipes. Insulate the first three feet from the water heater for the most impact.
Step 3. Cut Insulation
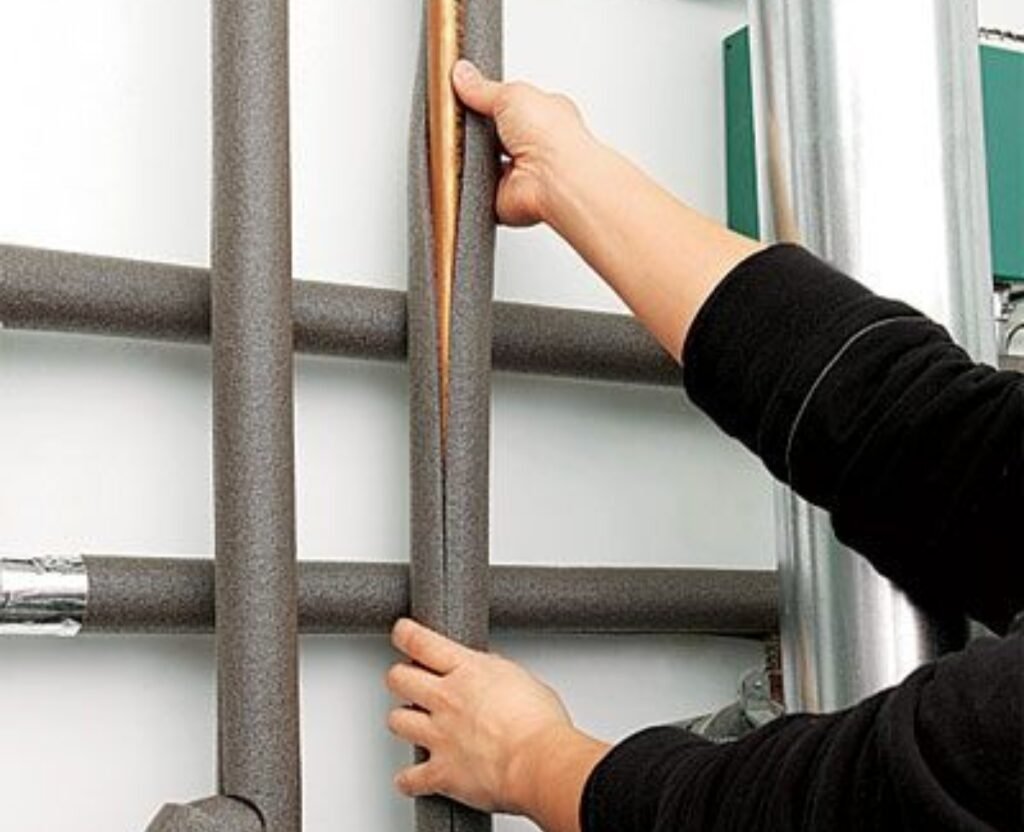
For foam tubing, ensure the pre-slit edge is aligned with the pipe.
Step 4. Apply to Pipes
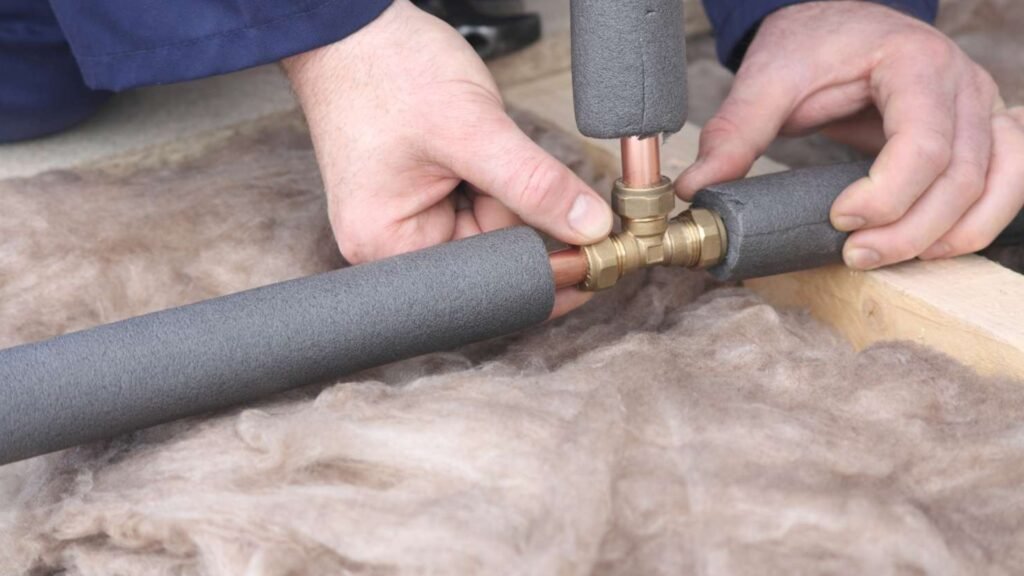
Wrap insulation around the pipes. Place seams along the underside of pipes to reduce exposure. For bends or joints, cut sections that fit securely.
Step 5. Secure Insulation
Use adhesive tape, aluminum foil tape, or zip ties to hold insulation in position. Space fasteners evenly, every 12 to 18 inches, for uniform results.
Step 6. Check for Gaps
Inspect the installation for gaps or loose areas. Seal openings to ensure consistent performance across all sections.
Cost Considerations for Pipe Insulation
Pipe insulation is affordable for most homeowners. The typical cost ranges between $20 and $50 for standard materials in small homes. Larger homes or professional installations may require a higher budget.
Investing in insulation pays off quickly. Energy savings can reduce heating bills by 3% to 10% annually, depending on household water usage. Homes that experience freezing temperatures benefit greatly from reduced maintenance costs due to frozen pipe damage prevention.
Tips for Maximizing Savings
Lower the Water Heater’s Temperature
Insulated pipes deliver hot water efficiently. Reduce the system’s temperature by 10°F to 120°F for energy savings without sacrificing comfort.
Insulate Cold Water Pipes
Though many homeowners focus only on hot water pipes, insulating cold water pipes near the heater provides additional protection. It can prevent condensation and improve the water system’s overall efficiency.
Conduct an Annual Inspection
Over time, insulation may degrade or shift. Inspect pipes yearly to check for worn-out sections.
Professional vs. DIY
For homeowners comfortable with projects, DIY insulation saves money. When dealing with hard-to-reach areas or complex systems, hiring a professional ensures proper installation and optimal savings.
Environmental Impact of Insulating Pipes
Insulating hot water pipes does more than save money. It also benefits the environment by reducing energy consumption. Energy-efficient homes require less electricity, gas, or oil, reducing greenhouse gas emissions. Small changes like insulating pipes contribute significantly to sustainable living.
Consider the added benefit of conserving water. Faster access to hot water leads to less wasted water while waiting. This practice supports global efforts to manage water scarcity.
Common Mistakes to Avoid
Avoid these errors to ensure pipe insulation works as intended:
- Skipping measurements: Always measure pipes first. Incorrect lengths lead to inefficient coverage.
- Ignoring joints and corners: These sections often go uninsulated. Use pre-cut pieces to match corners.
- Over-compressing insulation: Compression reduces the material’s efficiency. Handle with care.
Conclusion
Hot water pipe insulation blends financial savings, environmental sustainability, and home durability. The decision to insulate is simple yet impactful. Small actions within residences ripple outward, contributing to global conservation efforts. Hot water pipe insulation transforms homes into energy-efficient spaces while highlighting an often-overlooked opportunity for sustainable living.
Start with this small yet mighty improvement. Its cost is low, the installation process is manageable, and the benefits far outweigh the effort. Stay proactive by inspecting insulation annually and enjoying long-term rewards in comfort, savings, and efficiency.